Category Archives: Open Source
Недавно я случайным образом написал плагин для MyBatis. Написал тесты, readme, все дела. И даже прикрутил бейдж от travis-ci. Но самое главное ещё только предстояло сделать. А именно – запилить этот мейвеновский пакет в какой-нибудь публичный репозиторий. Я никогда ещё этого не делал, и сначала было пошёл смотреть, как опубликовать свой артефакт на Maven Central. Нашёл статью “Публикация артефакта в Maven Central через Sonatype OSS Repository Hosting Service”, полистал, и призадумался. Что-то всё как-то больно сложно. И вспомнил, что gretty, один из моих любимых плагинов для gradle, хостит свои релизы на jcenter. Решил попробовать – и вуаля ! Всё получилось. Единственный затык был связан с тем, что я заливал файлы в неправильный путь. И ещё пришлось догадаться сделать pom-файл отдельно, а не надеяться на парсер джарника. Чтобы вы не повторяли моих ошибок и туплений, напишу краткий гайд о том, как опубликовать простой обычный артефакт в jcenter.
- Сходите на https://bintray.com и зарегистрируйтесь
- В интерфейсе кабинета создайте свою организацию, внутри неё – maven репозиторий (с произвольным названием), далее внутри репозитория создайте пакет, а внутри пакета – версию. Версия должна быть release, то есть не содержать суффикса “SNAPSHOT”
- Подготовьте 3 файла:
- project-1.0.jar – этот файл обычно делается командой
mvn clean package - project-1.0-sources.jar – здесь можно попробовать команду
mvn source:jar - project-1.0.pom – а этот файл делается простым переименованием вашего
pom.xml
- project-1.0.jar – этот файл обычно делается командой
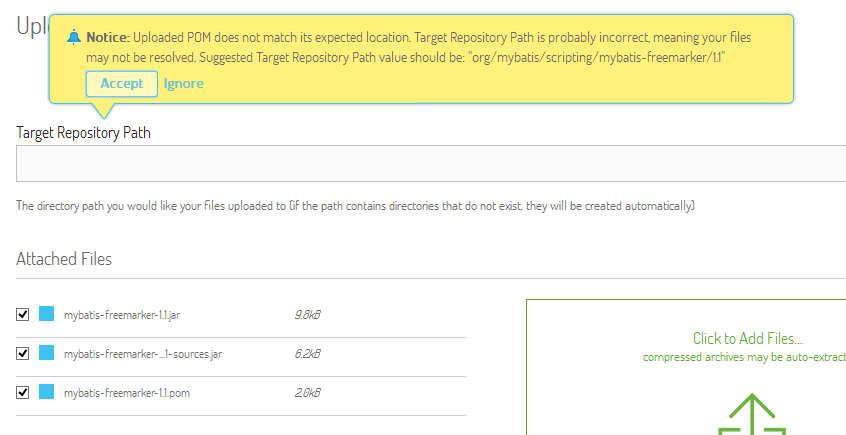
- В контексте версии в веб-интерфейсе перейтиде к странице загрузки файлов. Выберите сразу 3 файла и перетащите их в броузер. Вы должны будете увидеть что-то типа этого:
Жмите Accept, и пути будут выставлены корректно, согласно координатам, указанным в вашем pom-файле.
- Теперь bintray предложит опубликовать загруженные артефакты. Не отказывайтесь.
- Далее возвращаемся к версии, наводим мышку на Maven Central, и выбираем опцию Synchronize with jCenter. Если всё сделано правильно, то система примет этот запрос, и теперь остается некоторое время подождать, пока сотрудник jCenter рассмотрит его. Вам придет письмо на email и уведомление по внутренней почте.
- Артефакт успешно опубликован в jcenter и доступен для загрузки ! Теперь его можно просто брать и использовать, в мейвене :
<repositories>
    <repository>
        <id>jcenter</id>
        <url>http://jcenter.bintray.com</url>
    </repository>
</repositories>

<dependencies>
    <dependency>
        <groupId>org.mybatis.scripting</groupId>
        <artifactId>mybatis-freemarker</artifactId>
        <version>1.1</version>
    </dependency>
</dependencies>
или в Gradle:
repositories {
    jcenter()
}

dependencies {
    compile("org.mybatis.scripting:mybatis-freemarker:1.1")
}
Далее в планах все-таки попробовать запилить свой пакет в Maven Central, по результатам постараюсь отписаться тоже.
It is copy of my article on codeproject.com
Introduction
There are many APIs for creating GUI applications. They progress in development, staying more convinient, simplier, better. But nobody cares about old good text user interface ! Though it is very simple way to create application that can run on all platforms, including launching in terminal emulator connected via SSH. Imho, it is omission.When I was little and was studied at school, I had the Pentium I 133MHz computer. I used many TUI programs and I was impressed of how they were look like. It was RAR archiver, Norton Commander, FAR manager. But when I wanted to write something like it, I was dissappointed in tools that were available.
And I have decided to write my own library to provide the easiest and most efficient way to implement simple TUI applications using modern technologies.
Technical overview
The library is written in C#, it can be built in Windows, Linux and Mac OS X. In Windows there is no need in additional libraries because standard Win32 console API is enough. In Linux and Mac next additional libraries are used: libc, libtermkey and ncurses.
Native dependencies in Linux and Mac OS X
Libc is standard library, it is included in all Linux and Mac distros. It is used for polling (POSIX equivalent for WaitForMultipleObjects) standard input (STDIN) and self-pipe. Self-pipe is necessary to interrupt waiting for input event when need to execute some code in UI thread asynchronously.
NCurses is used for rendering symbols on the screen. Actually, it is not necessary to use this library, but I have decided to use this one to avoid troubles with different terminals correct handling. And using this library allowed me to port my code from Win32 to Linux/Mac quickly. In future, may be, ncurses will be removed from required dependencies.
Libtermkey is awesome library written by Paul Evans. It allows to handle keyboard and mouse input and don’t worry about various terminals. It has elegant C API.
Main objects
Central object of any program is ConsoleApplication. It is singleton object and is accessible via ConsoleApplication.Instance property. When you call ConsoleApplication.Run(control), it launches the event loop, which is stopped only after ConsoleApplication.Stop() method has been called.
You can pass any Control into Run() method. But usually, if you want to create windows-based program, you should pass WindowsHost instance there. WindowsHost is Control that manages the children: windows and single main menu.
Control passed to Run() method becomes a Root Element. Console application has only one Root Element and it cannot be changed before Stop() is called.
EventManager is responsible to deliver rounted events to their subscribers. Routed events work similar to WPF’s. They can be bubbling, tunneling or direct. Bubbling events are propagated from source control up to root of controls tree (Root Element), tunneling events are propagated from root to source. Direct events are not propagated in controls tree. Event Manager is single in application.
FocusManager tracks a keyboard focus. It is single object too, like Event Manager, and provides access to API for manipulating keyboard focus. Controls are allowed to call FocusManager.SetFocusScope() method or FocusManager.SetFocus() to pass keyboard focus to specified control.
Layout system
Layout system is similar with Windows Presentation Foundation. But in this library there are no separation on ContentControls and ItemsControls. Any Control can have a one child or a multiple children. But algorithms of measuring and arrangement are quite identical to WPF. If you want to write your custom control, you should read about WPF Measuring and Arranging children. Differences from WPF in layout:
- No ContentControls and ItemsControls.
- No templates: there is no need to do this. It is complex, and console controls don’t have many pixels to allow template composition.
- No difference between LogicalTree and VisualTree (because #2).
- No
InvalidateMeasure()method.Invalidate()invalidates control entirely.
Rendering system
Rendering is implemented in Renderer class. It is called on every event loop iteration and updates all invalidated controls. If you have called Invalidate() for some control, it will refresh its rendering buffer and will flush it to screen anyway. If you have called Invalidate() on some child control, and this control has been remeasured to the same size, parent control will be not affected in invalidation process. Invalidation status propagates to parent if remeasured child’s desired size differs from previous calculation.
After processing of invalidated controls updated controls are flushed their rendering buffers to PhysicalCanvas instance. Finally, PhysicalCancas flushes its buffer to the terminal screen.
XAML and Data Binding
XAML support is implemented using custom parser. This choice is done to avoid troubles with standard .NET XAML API and avoid dependencies from WPF parts of .NET class library. Differences from WPF in XAML are:
- No Attached Properties (mb will be added later)
- No generated code: whole markup is parsed in run-time
- No
x:Nameattribute, instead –x:Id - No includes support (will be added later)
- May be some differences in handling values conversion, adding to collections (because this XAML handling method differs from WPF’s code generation scheme)
- Some differences in markup extension syntax – no unescaped symbols in single quotes allowed, for example.
- Data Context object does not inherit from parent controls, it is passed as argument and remains actual to whole object configured using specified XAML.
Source code
Source code is available on my github: https://github.com/elw00d/consoleframework, current state is zipped and attached to article.
Documentation is available only in russian yet, but will be translated later.
Simple example
Let me show you some examples of using this API. Look at the Commanding example.

Next markup creates a Window with CheckBox and Button. CheckBox‘es Checked property is bound to ButtonEnabled property of data context. Button’s Command refers to MyCommand property of same context.
<Window> <Panel> <CheckBox Caption="Enable button" Margin="1" HorizontalAlignment="Center" Checked="{Binding Path=ButtonEnabled, Mode=TwoWay}"/> <Button Command="{Binding MyCommand, Mode=OneTime}">Run command !</Button> </Panel> </Window> |
DataContext is necessary to make a data bindings work:
/// <summary> /// INotifyPropertyChanged is necessary because we are using TwoWay binding /// to ButtonEnabled to pass default value true to CheckBox. If Source doesn't /// implement INotifyPropertyChange, TwoWay binding will not work. /// </summary> private sealed class DataContext : INotifyPropertyChanged { public DataContext() { command = new RelayCommand( parameter => MessageBox.Show("Information", "Command executed !", result => { }), parameter => ButtonEnabled ); } private bool buttonEnabled = true; public bool ButtonEnabled { get { return buttonEnabled; } set { if ( buttonEnabled != value ) { buttonEnabled = value; command.RaiseCanExecuteChanged( ); } } } private readonly RelayCommand command; public ICommand MyCommand { get { return command; } } public event PropertyChangedEventHandler PropertyChanged; } |
When ButtonEnabled changes it causes to command.CanExecute to be changed too. It affects Disabled status of the button.
Entry point code is simple too: it just loads the WindowsHost and Window from XAML and launches the main event loop:
public static void Main(string[] args) { DataContext dataContext = new DataContext(); WindowsHost windowsHost = (WindowsHost)ConsoleApplication.LoadFromXaml( "Examples.Commands.windows-host.xml", dataContext); Window mainWindow = (Window)ConsoleApplication.LoadFromXaml( "Examples.Commands.main.xml", dataContext); windowsHost.Show(mainWindow); ConsoleApplication.Instance.Run(windowsHost); } |
WindowsHost is the main control here, it holds all windows and main menu. Main menu is declared in windows-host.xml file:
<WindowsHost> <WindowsHost.MainMenu> <Menu HorizontalAlignment="Center"> <Menu.Items> <MenuItem Title="_Commands" Type="Submenu" Gesture="Alt+C"> <MenuItem Title="_Run command" TitleRight="Ctrl+R" Gesture="Ctrl+R" Command="{Binding MyCommand, Mode=OneTime}"/> </MenuItem> </Menu.Items> </Menu> </WindowsHost.MainMenu> </WindowsHost> |
More complex example


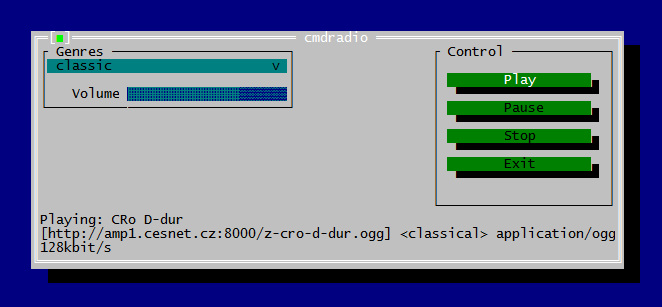
It is TUI wrapper for cmdradio project. I have just appended ~200 lines of code to original cmdradio sources to create this program. And here is XAML markup for main window:
<Window Title="cmdradio" xmlns:x="http://consoleframework.org/xaml.xsd" xmlns:cmdradio="clr-namespace:cmdradio;assembly=cmdradio"> <Window.Resources> <cmdradio:StringToTextBlockVisibilityConverter x:Key="1" x:Id="converter"/> </Window.Resources> <Panel> <Grid> <Grid.ColumnDefinitions> <ColumnDefinition/> <ColumnDefinition Width="*"/> </Grid.ColumnDefinitions> <Grid.RowDefinitions> <RowDefinition/> </Grid.RowDefinitions> <GroupBox Title="Genres"> <Panel Orientation="Vertical"> <ComboBox ShownItemsCount="20" MaxWidth="30" SelectedItemIndex="{Binding Path=SelectedGenreIndex, Mode=OneWayToSource}" Items="{Binding Path=Genres, Mode=OneWay}"/> <Panel Orientation="Horizontal" HorizontalAlignment="Right" Margin="0,1,0,0"> <TextBlock Text="Volume"/> <cmdradio:VolumeControl Percent="{Binding Path=Volume}" Margin="1,0,0,0" Width="20" Height="1"/> </Panel> </Panel> </GroupBox> <GroupBox Title="Control" HorizontalAlignment="Right"> <Panel Margin="1"> <Button Name="buttonPlay" Caption="Play" HorizontalAlignment="Stretch"/> <Button Name="buttonPause" Caption="Pause" HorizontalAlignment="Stretch"/> <Button Name="buttonStop" Caption="Stop" HorizontalAlignment="Stretch"/> <Button Name="buttonExit" Caption="Exit" HorizontalAlignment="Stretch"/> </Panel> </GroupBox> </Grid> <TextBlock Visibility="{Binding Path=Status, Mode=OneWay, Converter={Ref converter}}" Text="{Binding Path=Status, Mode=OneWay}"/> <TextBlock Visibility="{Binding Path=Status2, Mode=OneWay, Converter={Ref converter}}" Text="{Binding Path=Status2, Mode=OneWay}"/> <TextBlock Visibility="{Binding Path=Status3, Mode=OneWay, Converter={Ref converter}}" Text="{Binding Path=Status3, Mode=OneWay}"/> </Panel> </Window> |
This example shows how to create Grid-based markup and how to place controls in it. Markup is very similar to WPF’s XAML. As you can see, it is not so big markup (and can be optimized) for this complex layout.
Participating in the project
Library is in active development now, so help in writing additional controls and documentation is greatly appreciated. Next controls are missing yet: tab panel, text editor, context menu, radio button, status bar, dock panel. If you want to help in writing them or have great ideas to improve project, write me email to elwood.su@gmail.com or connect via github.
TLDR
It is cross-platform API allows to develop TUI-apps using modern technologies based on WPF concepts : XAML, Data Binding, Routed Events, Commands, WPF-compatible layout system. Runs on Windows (x86, x86_64), Linux (x86, x86_64) and on Mac OS X. Compatible with vast majority of terminal emulators including putty, xterm, gnome-terminal, konsole, yaquake, Terminal App (Mac OS), iTerm2 (Mac OS). See examples and docs if you want to try build TUI app with this toolkit.

This guide covers a process in Windows with TortoiseHG as mercurial client.
Install git, generate ssh keys
- Install git
- Sign up for github
- Generate ssh keys and store it into ~/.ssh
- Upload ssh keys to your github account
- Create git repo
Install hg-git extension
- Install python3 and set up PATH to python bin directory
- Clone hg-git plugin source code
- Add full path to hg-git source code to ~/mercurial.ini
[extensions]
hggit = c:\Users\Igor\hg_plugins\hg-git\hggit
Without trailing slash !
Configure mercurial’s putty to use git ssh key
- Generate key pair file for putty (import existing keys and export as ppk)
using puttygen tool - Add ssh key parameter to
[ui]section of ~/mercurial.ini[ui] ssh=TortoisePlink.exe -i "c:\Users\Igor\.ssh\elwood.ppk"
Push changesets to it!
- Run commands inside your hg repo:
$ hg bookmark -r default master # make a bookmark of master for default, so a ref gets created
$ hg push git+ssh://git@github.com:elw00d/consoleframework.git
- If your mercurial commits are not recognized in github as yours, check the email of your git ssh key
and email of committers. They should be equal to allow github detect that it was you.
Congratulations, you now have a mirror of your mercurial repo !
Support your mirror in actual state
If you have pulled some changesets from another hg repo, you may to want to push it to git. But your master bookmark needs to be “fast-forwarded”. To do this, use a command
$hg bookmark master |
After that you can push to git repo again. Btw, usually if you run hg pull && hg update, bookmark will be updated automatically.

1