Category Archives: .NET
Полгода назад я впервые попробовал .NET Core. В тот раз даже запустить helloworld не получилось, но это потому что я запускал его на Ubuntu 15.10, а формально поддерживалась только 14.04. С тех пор прошло немало времени, вышел официальный релиз 1.0 (в котором разработчики отпилили поддержку --native). Добавилась документация на официальном сайте. И я подумал – а почему бы и не попробовать ещё разок ? Пробовать решил на Console Framework. В принципе, это несложный проект, состоящий из нескольких модулей. Внешних зависимостей у него нет.
Установка .NET Core
Не вызвала проблем. Ставил на Ubuntu 14.04 по официальному гайду.
Отдельные модули
Для начала я взялся за те модули, которые не зависят от других. Для того, чтобы .NET Core собрал модуль, нужно, чтобы рядом с кодом модуля лежал файл project.json. Надо где-то получить шаблон этого файла. Я сделал 2 пустых проекта: один командой dotnet new, другой командой dotnet new -t Lib. Почему-то в них оказались разными ссылки на дефолтные библиотеки. Для исполняемого модуля было указано “netcoreapp1.0”:
{
  "version": "1.0.0-*",
  "buildOptions": {
    "debugType": "portable",
    "emitEntryPoint": true
  },
  "dependencies": {},
  "frameworks": {
    "netcoreapp1.0": {
      "dependencies": {
        "Microsoft.NETCore.App": {
          "type": "platform",
          "version": "1.0.0"
        }
      },
      "imports": "dnxcore50"
    }
  }
}
А для библиотеки “netstandard1.6”
{
  "version": "1.0.0-*",
  "buildOptions": {
    "debugType": "portable"
  },
  "dependencies": {},
  "frameworks": {
    "netstandard1.6": {
      "dependencies": {
        "NETStandard.Library": "1.6.0"
      }
    }
  }
}
Чтобы разобраться, что это за наборы библиотек и чем они отличаются, я сходил и почитал документацию, и ещё чуть-чуть. К сожалению, понимания это не добавило. Я просто попробовал оба набора, и в netstandard1.6 вообще ничего не завелось, а netcoreapp всё-таки получилось заставить работать. В общем, взял тот кусок “frameworks”, который про netcoreapp1.0.
Несовместимость
При сборке были ошибки. Например, почему-то отсутствовал метод Type.GetCustomAttributes(). Как выяснилось, в .NET 4.5 добавили промежуточный класс TypeInfo, и теперь надо дёргать Type.GetTypeInfo().GetCustomAttributes() – это новый extension-метод в System.Reflection. Аналогично пришлось поменять вызовы IsGenericType, IsEnum, GetEnumNames и GetEnumValues.
Assembly.Load(string assemblyName) пришлось заменить на AssemblyLoad(new AssemblyName(string assemblyName)).
Пропал ArrayList (который не-generic). Пришлось везде поменять на List<object>.
Пропал CharSet.Auto, заменил на CharSet.Unicode (это в интеропе).
А ещё пропал метод Assembly.GetExecutingAssembly(). Теперь его следует вызывать через typeof(SomeTypeInAssembly).GetTypeInfo().Assembly.
Environment.PlatformID пропал совсем (хз что делать, закостылил пока через условную компиляцию).
Не было обнаружено также свойство EventWaitHandle.SafeWaitHandle (тоже удалил через условную компиляцию, т.к. это был windows-specific код).
А ещё пропал класс ApplicationException. Не то, чтобы я сильно по нему скучал (по факту наличие таких исключений само по себе является проблемой в коде), но как-то все эти траублы не добавляют радости. Код действительно приходится портировать, несовместимостей в API очень много.
Многомодульный проект
Когда получилось добиться успешной сборки двух не зависящих ни от чего модулей, я приступил к настройке третьего модуля, который использует первые два. Почему-то в официальном гайде указано, что в родительском каталоге нужно завести файл global.json, однако это совершенно не нужно. Всё работает и без него. Нужно лишь явно указать название и версию каждому модулю в их project.json (“name” и “version”), а в project.json зависящего от них модуля прописать их в dependencies:
  "dependencies": {
    "Binding": {
	"version": "1.0.0",
	"target": "project"
    },
    "Xaml": {
	"version": "1.0.0",
	"target": "project"
    }
  }
После этого при попытке собрать этот проект dotnet автоматически будет собирать и зависимости.
entry points
Осталось настроить сборку ещё одного модуля – собственно исполняемое приложение. Тут поджидала ещё одна проблема. У меня этот модуль содержал несколько классов Program, в каждой из которых был свой метод Main(). В mono и обычном .net можно было спокойно указать класс, который использовался бы как EntryPoint. В .net core почему-то эта штука вообще не работает. По документации, можно определить название метода, однако судя по всему, эта директива вообще игнорируется. Пришлось просто исключить все “лишние” файлы с точками входа:
"exclude": [
  "RadioButtons/**",
  "TreeView/**",
  "Commands/**",
  "AsyncUIUpdate/**",
  "TabControl/**",
  "MainMenu/**",
  "CheckBoxes/**"
],
Заодно узнал, как прописывать embedded ресурсы:
"resource": [
  "**/*.xml"
],
После всех этих манипуляций проект наконец собрался и даже запустился (когда я подложил libtermkey.so), однако пока рано радоваться:

Ничего не работает, похоже, что с interop’ом в .NET Core большие проблемы.
Кстати, забавно, что dotnet build не создает exe-файлы для исполняемых модулей, делает только dll.
Документация
Документация очень плоха. Официальные гайды слабы. Взять например project.json reference. Дефолтные значения атрибутов не указаны (а в исходной версии этой доки они были!), часть информации устарела. В сети тоже много всего разного. Часто найденные рецепты противоречат друг другу. И не очень понятно, где искать инфу про то, что есть в библиотеке, а чего нет. Был бы нормальный декомпилятор .NET под линукс, было бы проще, но его, похоже, нет. Встроенный в MonoDevelop декомпилятор не справляется (просто не может открыть сборку). Вкупе с другими многочисленными проблемами, всё это делает меня грустить. Я уже не говорю о тулинге (чтобы не пришлось руками редактировать json-файлики). В общем, пока использовать .NET Core рановато. Буду ждать очередных релизов и выхода Rider.
В завершение прикладываю diff изменений (в отдельной ветке), чтобы можно было посмотреть примеры файлов project.json.
Прочитал статью про новый .NET Core. Очень впечатлило то, что можно будет создавать нативные приложуньки так, как это делается в Go. То есть командуешь тупа
dotnet build --native
и на выходе – микроскопический (ну, может, не совсем микроскопический) бинарник, не требующий толстого .NET-рантайма. И это – со всеми плюшками языка C# и развитого туллинга (хотя бы отладчик есть, в отличие от того же Go) ! В общем, я загорелся попробовать на нём собрать свою любимую поделку.
Но не срослось. На крайней команде из гайда хелло-ворлд отказался приветствовать мир:
$ dotnet run
Compiling dotnet for DNXCore,Version=v5.0

Compilation succeeded.
    0 Warning(s)
    0 Error(s)

Time elapsed 00:00:01.4364181


Unhandled Exception: System.IO.FileNotFoundException: Could not load file or assembly 'System.Runtime,
Version=4.1.0.0, Culture=neutral, PublicKeyToken=b03f5f7f11d50a3a' or one of its dependencies.
The system cannot find the file specified.
В общем, решил, что пока рановато пробовать, завёл им issue и приготовился ждать. Очень надеюсь, что эта штука заработает хотя бы в течение года.
It is copy of my article on codeproject.com
Introduction
There are many APIs for creating GUI applications. They progress in development, staying more convinient, simplier, better. But nobody cares about old good text user interface ! Though it is very simple way to create application that can run on all platforms, including launching in terminal emulator connected via SSH. Imho, it is omission.When I was little and was studied at school, I had the Pentium I 133MHz computer. I used many TUI programs and I was impressed of how they were look like. It was RAR archiver, Norton Commander, FAR manager. But when I wanted to write something like it, I was dissappointed in tools that were available.
And I have decided to write my own library to provide the easiest and most efficient way to implement simple TUI applications using modern technologies.
Technical overview
The library is written in C#, it can be built in Windows, Linux and Mac OS X. In Windows there is no need in additional libraries because standard Win32 console API is enough. In Linux and Mac next additional libraries are used: libc, libtermkey and ncurses.
Native dependencies in Linux and Mac OS X
Libc is standard library, it is included in all Linux and Mac distros. It is used for polling (POSIX equivalent for WaitForMultipleObjects) standard input (STDIN) and self-pipe. Self-pipe is necessary to interrupt waiting for input event when need to execute some code in UI thread asynchronously.
NCurses is used for rendering symbols on the screen. Actually, it is not necessary to use this library, but I have decided to use this one to avoid troubles with different terminals correct handling. And using this library allowed me to port my code from Win32 to Linux/Mac quickly. In future, may be, ncurses will be removed from required dependencies.
Libtermkey is awesome library written by Paul Evans. It allows to handle keyboard and mouse input and don’t worry about various terminals. It has elegant C API.
Main objects
Central object of any program is ConsoleApplication. It is singleton object and is accessible via ConsoleApplication.Instance property. When you call ConsoleApplication.Run(control), it launches the event loop, which is stopped only after ConsoleApplication.Stop() method has been called.
You can pass any Control into Run() method. But usually, if you want to create windows-based program, you should pass WindowsHost instance there. WindowsHost is Control that manages the children: windows and single main menu.
Control passed to Run() method becomes a Root Element. Console application has only one Root Element and it cannot be changed before Stop() is called.
EventManager is responsible to deliver rounted events to their subscribers. Routed events work similar to WPF’s. They can be bubbling, tunneling or direct. Bubbling events are propagated from source control up to root of controls tree (Root Element), tunneling events are propagated from root to source. Direct events are not propagated in controls tree. Event Manager is single in application.
FocusManager tracks a keyboard focus. It is single object too, like Event Manager, and provides access to API for manipulating keyboard focus. Controls are allowed to call FocusManager.SetFocusScope() method or FocusManager.SetFocus() to pass keyboard focus to specified control.
Layout system
Layout system is similar with Windows Presentation Foundation. But in this library there are no separation on ContentControls and ItemsControls. Any Control can have a one child or a multiple children. But algorithms of measuring and arrangement are quite identical to WPF. If you want to write your custom control, you should read about WPF Measuring and Arranging children. Differences from WPF in layout:
- No ContentControls and ItemsControls.
- No templates: there is no need to do this. It is complex, and console controls don’t have many pixels to allow template composition.
- No difference between LogicalTree and VisualTree (because #2).
- No
InvalidateMeasure()method.Invalidate()invalidates control entirely.
Rendering system
Rendering is implemented in Renderer class. It is called on every event loop iteration and updates all invalidated controls. If you have called Invalidate() for some control, it will refresh its rendering buffer and will flush it to screen anyway. If you have called Invalidate() on some child control, and this control has been remeasured to the same size, parent control will be not affected in invalidation process. Invalidation status propagates to parent if remeasured child’s desired size differs from previous calculation.
After processing of invalidated controls updated controls are flushed their rendering buffers to PhysicalCanvas instance. Finally, PhysicalCancas flushes its buffer to the terminal screen.
XAML and Data Binding
XAML support is implemented using custom parser. This choice is done to avoid troubles with standard .NET XAML API and avoid dependencies from WPF parts of .NET class library. Differences from WPF in XAML are:
- No Attached Properties (mb will be added later)
- No generated code: whole markup is parsed in run-time
- No
x:Nameattribute, instead –x:Id - No includes support (will be added later)
- May be some differences in handling values conversion, adding to collections (because this XAML handling method differs from WPF’s code generation scheme)
- Some differences in markup extension syntax – no unescaped symbols in single quotes allowed, for example.
- Data Context object does not inherit from parent controls, it is passed as argument and remains actual to whole object configured using specified XAML.
Source code
Source code is available on my github: https://github.com/elw00d/consoleframework, current state is zipped and attached to article.
Documentation is available only in russian yet, but will be translated later.
Simple example
Let me show you some examples of using this API. Look at the Commanding example.
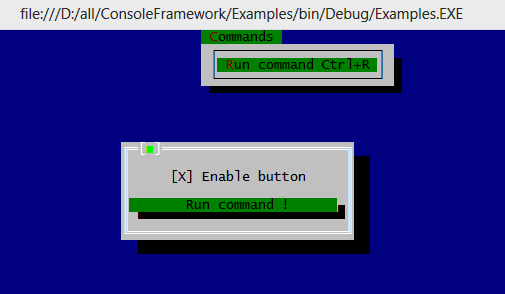
Next markup creates a Window with CheckBox and Button. CheckBox‘es Checked property is bound to ButtonEnabled property of data context. Button’s Command refers to MyCommand property of same context.
<Window> <Panel> <CheckBox Caption="Enable button" Margin="1" HorizontalAlignment="Center" Checked="{Binding Path=ButtonEnabled, Mode=TwoWay}"/> <Button Command="{Binding MyCommand, Mode=OneTime}">Run command !</Button> </Panel> </Window> |
DataContext is necessary to make a data bindings work:
/// <summary> /// INotifyPropertyChanged is necessary because we are using TwoWay binding /// to ButtonEnabled to pass default value true to CheckBox. If Source doesn't /// implement INotifyPropertyChange, TwoWay binding will not work. /// </summary> private sealed class DataContext : INotifyPropertyChanged { public DataContext() { command = new RelayCommand( parameter => MessageBox.Show("Information", "Command executed !", result => { }), parameter => ButtonEnabled ); } private bool buttonEnabled = true; public bool ButtonEnabled { get { return buttonEnabled; } set { if ( buttonEnabled != value ) { buttonEnabled = value; command.RaiseCanExecuteChanged( ); } } } private readonly RelayCommand command; public ICommand MyCommand { get { return command; } } public event PropertyChangedEventHandler PropertyChanged; } |
When ButtonEnabled changes it causes to command.CanExecute to be changed too. It affects Disabled status of the button.
Entry point code is simple too: it just loads the WindowsHost and Window from XAML and launches the main event loop:
public static void Main(string[] args) { DataContext dataContext = new DataContext(); WindowsHost windowsHost = (WindowsHost)ConsoleApplication.LoadFromXaml( "Examples.Commands.windows-host.xml", dataContext); Window mainWindow = (Window)ConsoleApplication.LoadFromXaml( "Examples.Commands.main.xml", dataContext); windowsHost.Show(mainWindow); ConsoleApplication.Instance.Run(windowsHost); } |
WindowsHost is the main control here, it holds all windows and main menu. Main menu is declared in windows-host.xml file:
<WindowsHost> <WindowsHost.MainMenu> <Menu HorizontalAlignment="Center"> <Menu.Items> <MenuItem Title="_Commands" Type="Submenu" Gesture="Alt+C"> <MenuItem Title="_Run command" TitleRight="Ctrl+R" Gesture="Ctrl+R" Command="{Binding MyCommand, Mode=OneTime}"/> </MenuItem> </Menu.Items> </Menu> </WindowsHost.MainMenu> </WindowsHost> |
More complex example

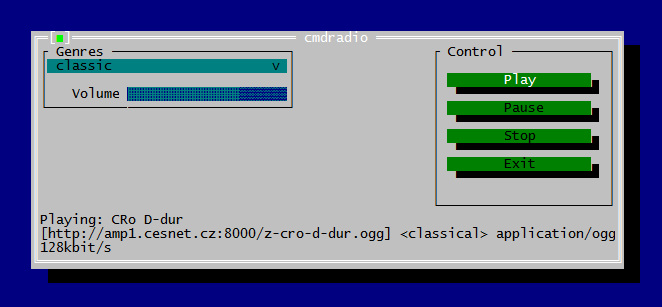
It is TUI wrapper for cmdradio project. I have just appended ~200 lines of code to original cmdradio sources to create this program. And here is XAML markup for main window:
<Window Title="cmdradio" xmlns:x="http://consoleframework.org/xaml.xsd" xmlns:cmdradio="clr-namespace:cmdradio;assembly=cmdradio"> <Window.Resources> <cmdradio:StringToTextBlockVisibilityConverter x:Key="1" x:Id="converter"/> </Window.Resources> <Panel> <Grid> <Grid.ColumnDefinitions> <ColumnDefinition/> <ColumnDefinition Width="*"/> </Grid.ColumnDefinitions> <Grid.RowDefinitions> <RowDefinition/> </Grid.RowDefinitions> <GroupBox Title="Genres"> <Panel Orientation="Vertical"> <ComboBox ShownItemsCount="20" MaxWidth="30" SelectedItemIndex="{Binding Path=SelectedGenreIndex, Mode=OneWayToSource}" Items="{Binding Path=Genres, Mode=OneWay}"/> <Panel Orientation="Horizontal" HorizontalAlignment="Right" Margin="0,1,0,0"> <TextBlock Text="Volume"/> <cmdradio:VolumeControl Percent="{Binding Path=Volume}" Margin="1,0,0,0" Width="20" Height="1"/> </Panel> </Panel> </GroupBox> <GroupBox Title="Control" HorizontalAlignment="Right"> <Panel Margin="1"> <Button Name="buttonPlay" Caption="Play" HorizontalAlignment="Stretch"/> <Button Name="buttonPause" Caption="Pause" HorizontalAlignment="Stretch"/> <Button Name="buttonStop" Caption="Stop" HorizontalAlignment="Stretch"/> <Button Name="buttonExit" Caption="Exit" HorizontalAlignment="Stretch"/> </Panel> </GroupBox> </Grid> <TextBlock Visibility="{Binding Path=Status, Mode=OneWay, Converter={Ref converter}}" Text="{Binding Path=Status, Mode=OneWay}"/> <TextBlock Visibility="{Binding Path=Status2, Mode=OneWay, Converter={Ref converter}}" Text="{Binding Path=Status2, Mode=OneWay}"/> <TextBlock Visibility="{Binding Path=Status3, Mode=OneWay, Converter={Ref converter}}" Text="{Binding Path=Status3, Mode=OneWay}"/> </Panel> </Window> |
This example shows how to create Grid-based markup and how to place controls in it. Markup is very similar to WPF’s XAML. As you can see, it is not so big markup (and can be optimized) for this complex layout.
Participating in the project
Library is in active development now, so help in writing additional controls and documentation is greatly appreciated. Next controls are missing yet: tab panel, text editor, context menu, radio button, status bar, dock panel. If you want to help in writing them or have great ideas to improve project, write me email to elwood.su@gmail.com or connect via github.
TLDR
It is cross-platform API allows to develop TUI-apps using modern technologies based on WPF concepts : XAML, Data Binding, Routed Events, Commands, WPF-compatible layout system. Runs on Windows (x86, x86_64), Linux (x86, x86_64) and on Mac OS X. Compatible with vast majority of terminal emulators including putty, xterm, gnome-terminal, konsole, yaquake, Terminal App (Mac OS), iTerm2 (Mac OS). See examples and docs if you want to try build TUI app with this toolkit.
1